Showing posts with label Water Color. Show all posts

Tuesday, November 17, 2015

Cheers to the New Year!


Hello stampy friends!!


I’m still busting my booty to get caught up – my oldest daughter and her family will be here on Friday, so I’ve got a lot to do before they arrive!  But I wanted to pop in and share a project that I created with some My Favorite Things products!


KKL_NOV1715


So I was surfing Pinterest (in my spare time – ha!) and came upon this awesome photo:
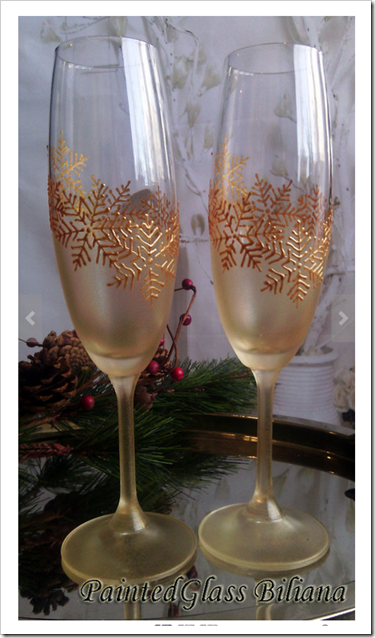
 

Snowflake Flutes


It truly inspired me!  I loved the translucency of the gold stems and angle on the flute, and the dimensional snowflakes embossed on the diagonal – soooo pretty!!  Here’s how I created my project:


  1. Trim an A2 top folding card base from Sweet Tooth Card Stock.  Score at 5.5”, fold in half, and perfect crease with Teflon Bone Folder.
  2. Die cut a scalloped rectangle panel from Translucent Vellum using the scalloped rectangle in the Blueprints 20 Die-Namics.  Die cut an image panel from Watercolor Cardstock using the stitched rectangle from the Blueprints 15 Die-Namics.
  3. Using light tack masking tape, mask off a portion of another piece of Watercolor Card Stock on a diagonal.  Paint the lower portion of the masked off panel with gold water color.  Allow to fully dry; once dry, die cut two champagne flutes using the Layered Champagne Glass Die-Namics.  Stamp the snowflake from the Snowflake Flurry Stamp Set onto each flute using Delicata Gold Pigment Ink; heat emboss it with clear embossing powder.
  4. Stamp the sentiment from the Hand Lettered Holiday Stamp Set onto the stitched image panel using Delicata Gold Pigment Ink.  Heat emboss it with clear embossing powder. Thin out the gold water color with water and splatter it with a paint brush onto the stitched image panel.  Stamp the “sparkles” from the Snowflake Flurry Stamp Set using the Delicata Gold Pigment Ink onto the image panel.
  5. Adhere the stitched image panel to the scalloped vellum panel using foam tape.  Adhere them to the card base with more foam tape.
  6. Adhere the champagne die cuts to the image panel with foam tape. Adhere the Sparkling Clear Sequins to the image panel with Glossy Accents.


Super simple, and a fun way to celebrate the new year!  This could easily be turned into a wedding card, or any kind of celebratory occasion for that matter!  I’ve listed the products that I used below.


That’s it for me, my friends.  I’ll be back in my craft cave getting stuff done all day long!  Thanks so much for dropping by today – I so love it when you do!!  Have a good one!


Tuesday, October 20, 2015

Essentials By Ellen Holiday II Blog Hop


EH Holiday II Hop Banner

Hello, and welcome to the Holiday II Essentials by Ellen Release Hop! I’ll be showcasing several of the new stamp sets and dies on my post today!

And, yay!!! I also get to give away an Essentials by Ellen stamp set!  The winner may chose ANY Essentials by Ellen brand stamp set (maximum value $15) currently in stock at Ellen Hutson.com  To enter my giveaway, please leave a comment on today’s post with a valid email address by October 27th!

There is also a crazy good Grand Giveaway in the CLASSroom! To enter, be sure to leave a comment there, also by October 27th, with a valid email address; winners will be announced at the CLASSroom on Friday, October 30th!

You should have arrived at my blog from the very talented Sharon Harnist.  If you get lost, please visit the CLASSroom blog for a complete list of all the designers.

Now that we’ve disposed of the hop details, would you like to see my projects?  Okay!!

Ellen-Hutson-Fall-Release-Autumn-Acorns-10-20-15

My first project features the previously released stamp set called Autumn Acorns.  This gorgeous stamp set now has coordinating dies – which makes me ever so happy!!  I decided to use the Autumn Acorns Designer Dies to create a “letterpress” look.  Basically, I used the leaves and acorns dies to die cut some Craft-a-Board (a lightweight chip board that cuts beautifully with wafer thin dies!).  I then placed those die cuts onto some Distress Watercolor Paper and ran them through my die cutting machine with a rubber embossing mat.  This “debosses” those shapes into the watercolor paper, leaving the perfect spot to stamp the coordinating Autumn Acorns images inside the debossed areas!  I stamped the images using VersaMark, heat embossed them with Gold Embossing Powder, and watercolored them with Distress Inks.  The sentiment is from the Fancy Thanks Stamp Set. Here’s a close up of that yummy dimension!

Ellen-Hutson-Fall-Release-Autumn-Acorns-Close-Up-10-20-15

For my next project, I was thrilled to little bits to get to play with the new Advent Stamp Set, as well as the coordinating Advent Designer Dies!  Check out this project!!

Ellen-Hutson-Fall-Release-Advent-10-20-15

Advent calendars are so much fun to create for the holidays!!  My oldest daughter’s family loves to do holiday-related activities during the advent season, so this new Advent Stamp Set and Coordinating Dies made this project easy peasy, lemon squeezie!  I had the frame from last year (but it’s still available on Amazon, HERE), so all I had to do was create the 25 pockets that each contain a tag designating a holiday-related activity.  I just know my grandsons are going to have a blast revealing each day’s holiday fun!  I used THIS website for ideas to include on each day’s tag.  Here’s a close up of what the pockets look like once assembled:

Ellen-Hutson-Fall-Release-Advent-Close-Up-10-20-15

You can see that I die cut the Advent Designer Dies from the die cut circles, and then I stamped the corresponding number inside the negative of the die cut and onto the scalloped circle using the Advent Stamp Set.  Here’s another close up showing what each pocket and enclosed tag looks like:

Ellen-Hutson-Fall-Release-Advent-Tag-Close-Up-10-20-15

I used a 6 x 6 paper pad so that each of the pockets feature a similar color palette.  But you could totally create this project using previously released holiday pattern paper that you already have in your stash!  This was super fun to create, and I’m so grateful to Julie for designing the Advent Stamp Set and coordinating dies to make this project come together so easily!

I’ve listed all of the products that I used for each of these projects below.  You can find ALL of the newly released Essentials By Ellen HERE.

The next stop on the hop is Nichol Magouirk’s amazing blog – no doubt you’ll be BLOWN away by her brilliant talent and genius!  Thanks so much for stopping by my blog today – I appreciate it more than you know!

Happy hoppin’!

AUTUMN ACORNS CARD PRODUCTS USED:

HOLIDAY ADVENT CALENDAR PRODUCTS USED: