
Hello Again!!
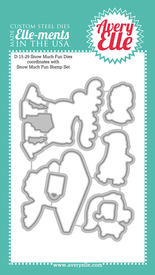
I’m popping in quickly to share another Avery Elle project featuring two new products from the Fall 2015 Release – Snow Much Fun and Snow Caps Elle-Ments!

How flippin cute is that moose?!! He seriously is my all time favorite Avery Elle image – he just makes my heart laugh!! Here’s how I created this project:
- Trim an A2 top folding card base from Sea Glass Card Stock; score at 5.5”, fold in half and perfect crease with a Teflon Bone Folder.
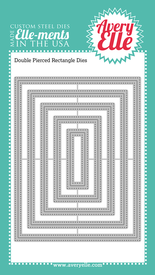
- Die cut another image panel from Sea Glass Card Stock using the Double Pierced Rectangle Elle-Ments. Stamp the snowflake image from the Snow Much Fun Stamp Set in VersaMark. Apply a light coat of liquid glue to each snowflake and sprinkle glitter. Allow to thoroughly dry. Once dry, adhere panel to the card base with foam squares.
- Die cut another panel from Solar White Card Stock using the Double Pierced Rectangle Elle-Ments.
- Using the snow slope dies from the Snow Caps Elle-Ments, die cut a short snow bank, and a taller snow bank from the white panel.
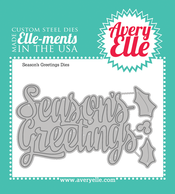
- On the shorter of the two snow slopes, stamp the sentiment from the Snow Much Fun Stamp Set in Cherry Pigment Ink, and heat emboss with Clear Embossing Powder. Die cut some holly leaves from Lemon Grass Card Stock and holly berries from the red and white patterned paper using the Season’s Greetings Elle-Ments. Adhere to the sentiment panel with foam squares.
- On the taller of the two snow slopes, mask off the upper part of the snow slope and lightly blend some Tumbled Glass and Broken China Distress Ink. Apply a coat of Glossy Accents to the ink blended area, sprinkle glitter, and allow to thoroughly dry. Once dry, adhere the taller snow slope to the card base with foam squares. Adhere the shorter snow slope on top of the taller snow slope with foam squares.
- Stamp the moose image from the Snow Much Fun Stamp Set onto a scrap of Solar White Card Stock using Tuxedo Black Ink. Die cut him out using the Snow Much Fun Elle-Ments, and color him in with Copic Markers.
- Stamp the moose image a second time onto some red and white patterned paper, and trim out the sweater and hat with detail scissors; adhere to the moose image. Tie some white crochet thread into a bow and adhere it to the moose with Multi Matte Medium. Adhere the moose to the card base with foam squares.
Is he not so stinkin’ cute?!! I want a pet moose!! LOL For more fun inspiration, please click on through to the Avery Elle Design Blog! I’ve listed the products that I used below.
That’s it for me today, friends! I’m still out of town, but will be back next week with more crafty goodness to share! Thanks so much for stopping by today!!
PRODUCTS USED:


6 comments:
What a cute card and cute moose image. Love your card.
Totally adorable!!! And I love the little sparkly ice pond you created for him to skate on!!! FABULOUS!
So stinkin' cute, Karolyn! LOVE!!!
Jolly is exactly what this skating moose is all about! With four legs, I'd bet that he'd have no problem pulling off a "quad toe" in combination with a triple axle!!!
STOP! Stop the cuteness! I LOVE this!
Oh my that is one hilarious looking moose!!!! I love how you decorated him and the color of the ice ♥
Post a Comment