
Hola, friends!!!
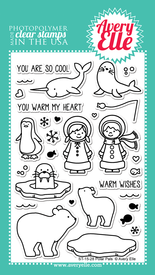
I’m in gramma heaven as I write this – I have the cutest little three year old boy sleeping in the next room, and my heart is so full. So I’ll be quick with my post today! I’m sharing another Avery Elle project featuring the new Polar Pals Stamp Set and Polar Pals Elle-Ments, as well as the Snow Caps Elle-Ments – all from the Fall 2015 New Release!

I fell in love with that cute little seal floating inside the ice donut. Like, how freakin’ cute is he?!! So I had this vision of him floating out in the ocean next to a snow bank. Did I pull it off?! LOL Here’s how I created this project:
- Trim an A2, top-folding card base from Smooth White Card Stock. Score at 5.5”, fold in half, and perfect crease with a Teflon Bone Folder.
- Using a Mini Ink Blending Tool, lightly blend Tumbled Glass Distress Ink onto the card base.
- Using the Snowfall Stencil, apply a coat of Snowflake Paste to the card base, and allow to completely dry.
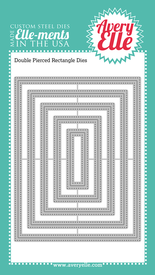
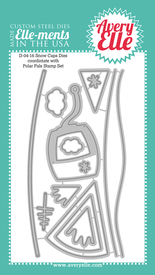
- Die cut two rectangle panels from Smooth White Card Stock using the Double Pierced Rectangle Elle-Ments. Then use the slopes dies from the Snow Caps Elle-Ments to create snow slopes.
- Mask off the top portion of the front snow slope with post it tape, and blend Broken China and Salty Ocean with a Mini Ink Blending Tool to create water.
- Stamp the sentiment from the Polar Pals Stamp Set using Onyx Black Pigment Ink, and heat emboss it with Clear Embossing Powder. Stamp the hearts from the Polar Pals Stamp Set using Strawberry Pigment Ink.
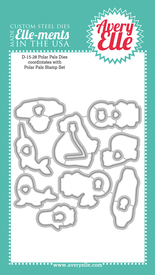
- Stamp the seal image from Polar Pals onto Smooth White Card Stock using Tuxedo Black Ink, and die cut the image using the Polar Pals Elle-Ments. Color the image with Copic Markers. Apply a coat of Glossy Accents to the image, sprinkle lightly with glitter, and allow to completely dry.
- Assemble the card with foam squares.
- Wrap red and white baker’s twine around the top of the card, and tie into a bow.
So whatcha’ think?!! I think he’s pretty stinkin’ cute, if I do say so myself. LOL You should click on through to the Avery Elle Design Blog for more inspiration! I’ve listed all of the products that I used below.
That’s it for me today – I’m off to hang with that cute little boy I was talking about earlier, and then I get to hang out with his baby sister tonight – gramma heaven, I tell ya!!! Thanks for stopping by today – I sure do appreciate it!


2 comments:
Yep...everything about this sweet creation is "cool"...your beautiful shading, the sweet little walrus (?), the soft and pretty snowflake sky, the twine and my fav, the two wee hearts that draw attention to the cute sentiment.
You nailed it! What a cute (and cold) scene you created. Love your coloring and the texture you added to the background. Great little design. TFS
Post a Comment