
Hey hey!!
Hope this finds you all enjoying your week – did you get pinched on St. Patrick’s Day?! LOL We’re enjoying some beautiful sunshine and warm weather here in AZ while my husband’s cousins are here visiting. It’s always a BONUS when we have visitors and the sun shines brightly for them. It makes being a hostess much easier!
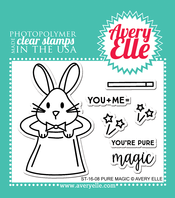
Anywho, I’m popping in today to share another project that I created using some of the Spring 2016 Release products from Avery Elle. Today’s project features the new Pure Magic Stamp Set and coordinating dies, as well as the New Moon Dye Ink! Have I told you how fantastic this ink is?!!! It’s a dye based ink, and specially formulated to use with any alcohol markers! It gives an amazingly dark impression every single time, and it dries uber quickly. You can use it with any of the current alcohol markers without heat setting (although, depending on the type of paper you use, I sometimes heat set just to be safe.) Let’s get to my project, shall we?

Check out that magical bunny!! Isn’t he too cute for words?!! Here’s how I created my project:
- Trim an A2, vertical, top-folding card base from Solar White Card Stock. Score at 5.5”, fold in half and perfect crease with a Teflon bone folder.
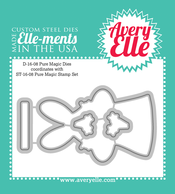
- Stamp the rabbit image from the Pure Magic Stamp Set onto some Solar White Card Stock using New Moon Dye Ink. Color it with Copic Markers and die cut it out using the coordinating Pure Magic Elle-Ments. Stamp the image a second time, color the rabbit with Copic Markers, and trim out only the rabbit’s head using detail scissors.
- Stamp the magic wand and stars images from the Pure Magic Stamp Set, color them Copic Markers, and die cut them using the Pure Magic Elle-Ments. Using a Quickie Glue Pen, apply a light coat of liquid glue to the stars and sprinkle a layer of Warm Diamond Glitter.
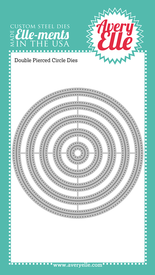
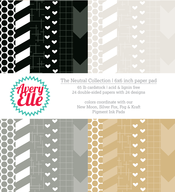
- Trim a piece of black and white grid paper from the Neutral Collection 6x6 Paper Pad. Die cut a circle from the center of the paper piece using the Double Pierced Circle Elle-Ments. Adhere the two pieces to the card base.
- Stamp the sentiment from the Pure Magic Stamp Set onto the card base using New Moon Pigment Ink. Heat emboss the sentiment using Clear Embossing Powder. Adhere strips of 1/8” Be Creative Double Sided Tape along the top and bottom of the patterned paper, remove the release paper, and sprinkle Warm Diamond Glitter all over the tape to cover it.
- Align and adhere the bunny face to the full image with foam squares. Adhere the assembled bunny image and the magic wand to the card base with more foam squares.
There you have it! A fun little card that would make anyone’s day more magical, don’t you think?!! I’ve listed the products that I used below. Please click on through to the Avery Elle Design Blog where you’ll find much more fun Avery Elle inspiration!!
That’s it for me today, friends! We’re off to enjoy the sunshine, then an early dinner and an evening San Francisco Giants spring training game!! I hope you have an awesome Friday, and an even better weekend!! Thanks so much for spending part of it here with me!


1 comment:
Love your card. This stamp set is so cute.
Post a Comment